Leaderboard


Popular Content
Showing content with the highest reputation on 04/04/2016 in all areas
-
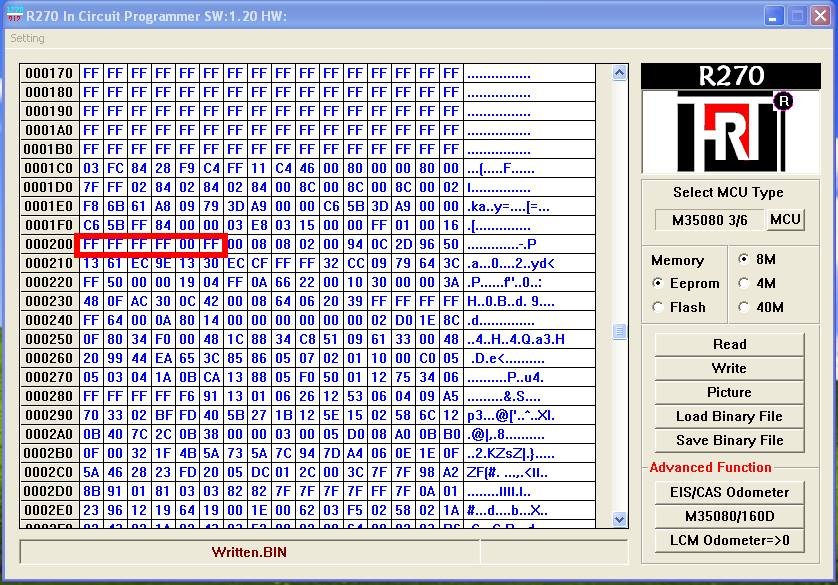
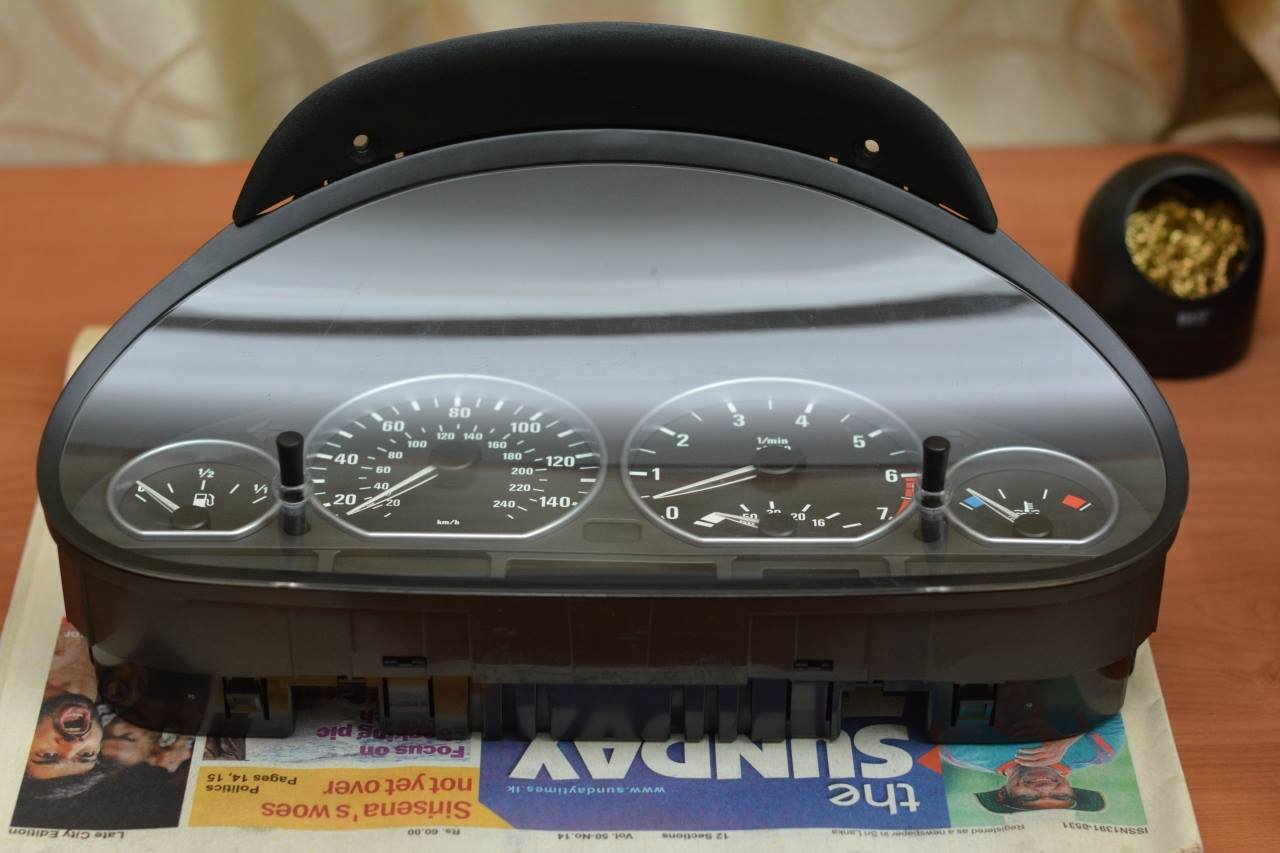
Next you want to find your VIN. The problem with that is there is no definite location its stored. So if you remember from earlier the VIN of the replacement cluster was “AW72288” what you want to look for is “AW” on the right side pane of the hex editor. Once you find a possible match look for the rest of the VIN. In mine 41 is ASCII for “A” and 57 is ASCII for “W” the rest is “72 28”. The next two numbers are some check digit. You want to leave that as it is. The last is “8” shown in the pic below. Turn all of that to “F” while keeping the check digit as is. “Click Save Binary File”. Now put the blank EEPROM in and try reading that to verify that it reads properly by following the steps mentioned previously. Next click “Load Binary File” and load the file you just edited. Now click write. After a few beeps you are done! Now apply fresh soldering paste to the terminals in the cluster. Remember to fix it the same orientation that you removed it at. Mine was upside down comparing with the rest of the board. Do some hot air soldering and we’re done! Remember to clean up that area with alcohol after it has cooled down. Now assemble in the reverse order that you took it apart. Word of caution, take care not to chip any of the edges of the LCD panels when you fix the metal enclosures around them. Fixing the dials is the same as disassembly. Turn counter clockwise and press down gently. Align then as best you can to the reference pics you took before removing them. Fix the cluster on to your car and turn your key to position 2. If all went well you’ll have a 0 or near 0 ODO meter reading. 0 mileage E46 . Note the tamper dot is still there. Now plug in the OBDII cable, put car in 2nd ignition position and fire up NCS Expert. Load the Expert Mode profile. Press “Vin/ZCS/FA” ZCS/FA f. ECU Select E46 and then EWS - This reads all the FA coding and VIN numbers and stuff from the EWS module Press “back” Press Process ECU Select “KMB” Select “Change Job” Select “CODIERINDEX_LESEN” Select “Execute Job” - This will read the coding index from the cluster Select “Change Job” Select “FA_ Schreiben” Select “Execute Job” - This write the FA coding (all the options) that you read from the EWS module to the cluster Select “Change Job” Select “SG_CODIEREN” Select “Execute Job” - This will code your cluster If all goes well the cluster should restart and you should end up with your actual mileage and the dreaded tamper DOT gone! (that and I fixed a burnt tail light and probably drove 38km too) Happy Coding!!


 8 points
 -
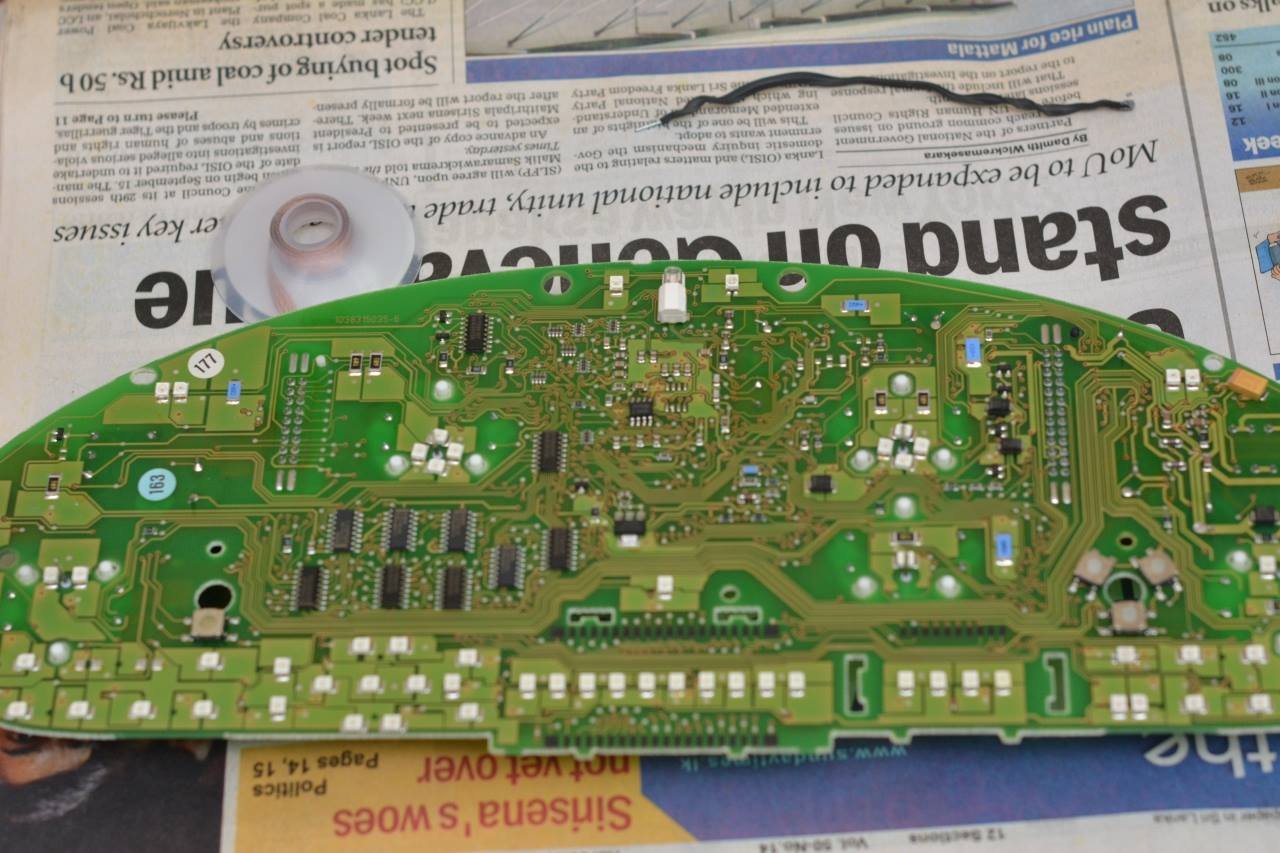
Ok so this is my first ever DIY post so bear with me. Recently I happened to buy a e46 it was in good nic till…. well the cluster died on me . I was looking at dishing out some 140K for a virgin cluster with programming or having to buy a used one and live with wrong mileage and the DREADED tamper dot. Being a software guy by trade, I started looking into buying a used one and to somehow reprograming it to get the correct mileage and VIN. It went well, thus this DIY. My existing cluster was Motormeter and my replacement was Bosch. Doesn’t really matter the manufacturer any e46 cluster should work but I got a pre-facelift cluster cause I’m paranoid. This DIY assumes you have NCSExpert installed and updated with the latest DATEN files. You are going to need a bucket load of stuff. A used e46 cluster (ebay) T20, T10 torx bit drivers. (ebay) Pieces of paper Some experience in hot air soldering (I’m a complete noob at it) A good hot air soldering station Solder Paste/Solder wic Tweezers Surgical Alcohol / Probably some beer too Cotton Wool Nerves of steel Blank M35080 EEPROM chip (ebay) R270+ chip programmer (ebay) A steady hand K+DCAN USB to OBDII cable (ebay) - http://www.ebay.com/itm/BMW-USB-OBD-DIAGNOSTIC-CABLE-INTERFACE-INPA-K-DCAN-ISTA-ISID-SSS-V32-Progman-/331800219469?hash=item4d40d58f4d:g:RpsAAOSw~otWcZo8&item=331800219469&vxp=mtr NCS Expert with latest E46 SP-DATEN files (I had v54 downloaded from https://mega.co.nz/#F!0N8A3LSb!kPyNeBaKoO1GaGoSokfuJA) Cluster Removal Pretty straight forward. Use the T20 torx bit and unfasten the 2 screws at the top. Unlock and pull steering wheel towards you and down to make room to take the cluster out. Pull the cluster out straight and try to partially take it out to the right hand side. There are two connectors at the back. One for power and the other is the CANBUS connector. You want to rotate the white tabs up so the connector backs out of the socket and pull them off. New Cluster Install Install the new cluster temporarily. Reverse of the way it was removed. Check if everything works properly. It doesn’t matter if you get a cog like sign on the panel where the gear selection is display. It will go away once you code it later. Plug in your OBD cable and fire up NCS Expert. Turn key to the 2nd position. No need to start the vehicle. Mine is a 2001 Preface-Lift so it might be different in newer cars. Load the Expert Mode profile. Press “Vin/ZCS/FA” ZCS/FA f. ECU E46 KMB (KMB means instrument cluster) You want to make note / take a screenshot of the FG code. This is the VIN that’s stored in the replacement cluster. Turn off the ignition. And remove the cluster and take it to your work area. Cluster Dis-assembly You might want to practice with the dead cluster first. I did and it was worth the experience. Mark where the 4 T10 screws are located. There are many more holes than screws for some reason. Better to put them back where they were removed from. Unscrew the all of them and pull off the back cover. Holding the circuit board from the square socket connectors pull it straight out. You would want to take care not to touch the black printed board with all the speed / rpm values and stuff. It’s a matte black paint and gets scratched easily (ask me how I know), which will ruin the cluster. Tap the 5 needles so they are settled at the lowest position. Take some pics of exactly where they stop/rest because you are gonna remove them and you want to put them back at the correct positions. Now take a clean piece of paper, rip it in the middle like the pic and place it between the needle and printed board. This is for protection because you are bound to scratch the board if you do not. Now twist the needles counter clockwise while pulling up very gently. It’ll take about two full turns before the needles come out. If you pull too much the black pieces at the middle tend to brake off (This is why you should practice on the dead cluster). You want to remove the RPM needle last because it gets blocked by the fuel consumption needle when you try to turn it. At assembly the fuel consumption needle should be installed last. Once all the needles are removed, gently pull out the printed card and then the clear plastic bit under it. Next remove the two LCD panels (if automatic) one if manual, by releasing the clips at the back and pushing the metal frames out. Take note of the orientation they come out at. You would want to put them back the same way. Now the white plastic back panel should come off easily.


 3 points
 -
Adding Politicians too to the list who are selling permits. However, don't know whether police will issue same tickets for politicians, yuha, guha, and naha vehicles who are the morons on the road only second to private bus drivers.3 points
-
Guys, I need a Toyota KR41 (Townace – Noah) carburetor engine (5K, 1500cc) and a manual gearbox (5 forward). [This engine is not using nowadays as I know. Almost all are converted to diesel.] Does any of you know a place I can look for..? I've heard that there is a place converting KR to CR in Wadduwa. Do you guys have a contact number..? Thanks and appreciate your help.1 point
-
I can 100% confirm that latest toyota hybrids do not have this inconsistent power output. Only older toyota and honda ( insight and civic) hybrids have this issue. They way how it solved is by not allowing HV battery to go below around 40% charge. So for a quick acceleration, always enough juice is available. I have tested my Aqua's 0-100 time with different charge levels and it was always 10sec. However if battery is low, engine will rev more. So you cannot guess acceleration by listening to engine sound.1 point
-
Not a problem, on bimmers the milage data is stored in the Guage cluster and Klm (light control module). They both check the data with the vehicle Vin no and if there is mismatch it will indicate a dot in the odometer. It's not as simple to do as in a jap1 point
-
This is one of good work the police implemented even as a pilot project. There can be some issues like waka pointed. They need to find solutions to overcome such issues and continue the project. As a driver as well as a pedestrian, I am honestly happy this type of work. We can expect more safe road in the future.1 point
-
Thanks! That's the 1st thing I did, but did not work. The stepper motors started buzzing like crazy. At first I thought maybe the bosch and motometer ROM programming might have been different, but later when I tried to read the old chip in R270+ programmer it did not detect it. So what ever killed the cluster had killed the EEPROM too. A direct swap should be possible if you can get a cluster of the same make from a car that has a relatively close YOM but you do need to code it via NCSExpert. This is because after the coding finishes it stores some defaults like the min/max values of the stepper motors for each of the needles in the EEPROM. This is different for every cluster. But it saves you the trouble of buying a R270+ programmer.1 point
-
I first heard More than this when I was playing GTA some of them stations had awesome 80's - 90's tracks. To me Ferry's best song is Slave to Love.1 point
-
Far out!!! Superb job machan! Looks like you've got a mini laboratory at home now. Any idea if this would work simply by swapping the ROM chip to the new cluster without resetting the mileage and VIN? Since the values match up with the values on other modules on the car (which I'm guessing is external to the cluster), could there be any issues? Just curious.1 point
-
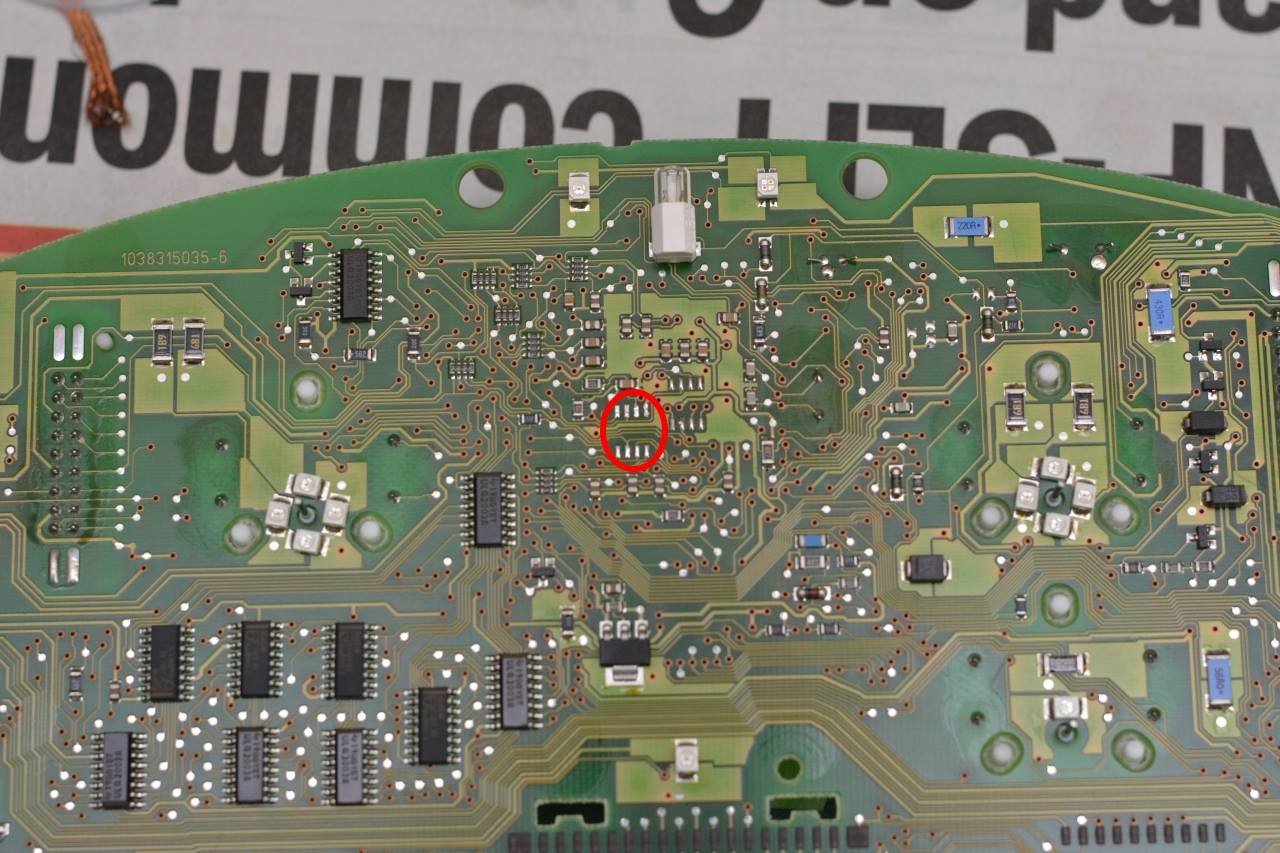
This chip in the middle is the one you want to remove. It’s a M35080 EEPROM depending on the YOM of your car this would be a M35080 3/6, 35080-VP/V6, D80D0WQ. I don’t know if they are interchangeable but I ordered the exact same chip that was soldered to the used replacement cluster. Whip out your soldering station. Kinda disorganized I know . Go for a hot air nozzle size that is kind of the same width as your eeprom chip since it will heat the lead solder on all of the legs at the same time and it will be easy to remove. Set it to something around 350 deg and set hot air speed to something on the low side. You don’t want other parts flying off while trying to remove the EEPROM. Tweezers, soldering wick and paste at the ready! EEPROM removed and old solder needs to be removed using your wick and soldering iron. Don’t throw away the chip just yet! We need to read it. So here’s where it got interesting. On the 1st try I soldered a blank chip on to the board, re assembled the cluster and tried to code it using NCSExpert and I kept getting an error saying the coding index was wrong. Then I tried coding using the official BMW software called Progman SSS v32, that didn’t work either. All the forum posts I read say it should work but no luck for me. So I had this idea to read the EEPROM data from the cluster I bought and to somehow erase the VIN and mileage and write it back to a blank EEPROM and solder that back on to the cluster. You can’t seem to do this directly on the chip that already exists on the cluster cause the area that stores mileage info is an incremental register and can’t be rolled back to 0. You can however erase the VIN, BUT be WARNED!! When the VIN matches the ones on your other modules like for example your DME and LSZ, it tries the sync the mileage across all modules. So if the mileage on the replacement cluster is larger than the actual mileage of your car it’ll increase the mileage info on all the other modules as well, and I guess there is no recovering from that one! If it’s lower, it should get updated with a higher value. But not too sure since I read somewhere that the mileage should be 0 or within 120km to sync properly. Anyway, this is where the R270+ programmer comes in. It’s comes with some really old software that seems to only work on XP or lower, so I installed that on to a Virtual Machine to do the read/write operations. What you do is you take the chip that you removed from the cluster and insert it into this guy Press the black square mount down and insert the chip. Make sure all the legs have good contact. The number 1 pin on this is the lower left most one. The EEPROM chip had no markings to indicate what pin 1 was and it worked if I put the chip so the text on it was upside down . Fix this on to your programmer box and fire up the software. Press "MCU" Select your EEPROM type, mine was a M35080 3 Press read and the main screen, click yes when it asks if it should check pins. If it fails at this stage, try mounting the EEPROM the other way around or try cleaning the legs with alcohol. The top two lines store your mileage. You want to edit it here and make them all 0’s


 1 point


This leaderboard is set to Colombo/GMT+05:30